How to Install a Garage Door Track – Question: Could a few careful steps now save you stress and a costly repair later?
We’re Garage Home Pros, family owned since 2014. We serve Davenport, FL and nearby towns within a 20‑mile radius. Our team offers fast, friendly service and clear guidance for safe, reliable installation work. Call (321) 200-0727 or email garagehomepros@gmail.com.
This short guide sets a clear path. You’ll learn key parts, simple steps, and safety checks. We cover bottom panel setup, vertical rails, the curved section, and ceiling hangers. Small adjustments early prevent binding and noise later.
We emphasize safety around high‑tension springs and overhead work. Manual systems are easier since they are lighter and have fewer parts. If anything feels risky, we’re one call away and ready to finish the job to manufacturer specs.
Key Takeaways
- Follow a step‑by‑step plan for smooth, quiet operation.
- Know each part and its role before starting.
- Leave fasteners loose for final alignment checks.
- Prioritize safety with springs and overhead fittings.
- Call us for fast, professional service when needed.
What this guide covers and when DIY makes sense
We give straightforward guidance so you can judge which tasks are safe for DIY and which need pros. Safety is central: some jobs are low risk, others involve high tension parts and require trained hands.
This guide covers prepping the door opening, centering panels, assembling vertical and curved sections, and confirming smooth movement before final tightening. We explain the process in clear steps and point you toward manufacturer instructions and videos when needed.

Most homeowners can handle panel stacking, hinge and bracket placement, and initial rail positioning. Measure the opening for correct size and squareness first. A tight or oversized opening changes how parts fit and can cause binding or damage.
- DIY-friendly: panel placement, rollers, and basic alignment.
- Leave to pros: torsion springs, cable tensioning, and complex motor hookups.
- If you prefer not to do it: we remove old units, install garage systems, and test everything for reliable operation.
Call (321) 200-0727 or email garagehomepros@gmail.com for same-day service in Davenport, FL and nearby towns. We work Monday–Saturday, 8:00 a.m.–9:00 p.m., with no after‑hours fees.
Essential tools, materials, and safety before you start
Before any work begins, gather the right tools and confirm the opening is ready. This step makes the job faster and reduces risk. We recommend checking the framing, center pad, and nominal size of the panel set so nothing is forced later.

Keep safety front and center. Wear gloves, safety glasses, and sturdy shoes. For torsion springs, only use 1/2″ cold‑rolled winding bars and follow manufacturer procedures. Never substitute makeshift tools for high‑tension parts.
- Gather tools: level, electric drill with 5/32″ and 1/4″ bits, ratchet set, open‑end wrenches, locking pliers, screwdrivers, and a small step ladder.
- Organize hardware: rollers, hinges, brackets, lag screws, and track sections so left/right parts stay separate while panels are handled.
- Prep the opening: verify door size, check for plumb and square, and confirm the center pad is at least 15″ and pre‑drilled for lag screws.
- Inspect structure: replace weak or split wood before fastening brackets; solid anchors prevent future failure.
If you lack the right tools or prefer a pro setup, we can bring everything and finish the job in one visit. Call Garage Home Pros at (321) 200-0727 or email garagehomepros@gmail.com. We’re family‑owned since 2014 and ready to help—fast and friendly.
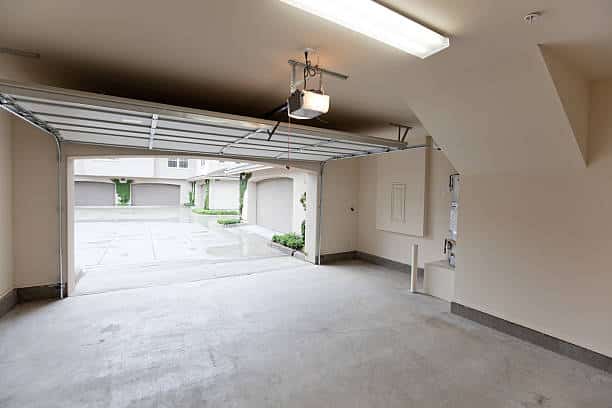
How to install a garage door track
Start by placing the vertical assemblies so rollers seat cleanly and the opening stays even. Position each vertical track about 1/2″ from the panel edge and align brackets with framing studs.

Insert rollers into hinges and bottom fittings, then wrap the vertical tracks around the wheels. Lag screws should be set snug but left slightly loose for final adjustment.
- Set the bottom of each vertical track so rollers sit without squeezing the panel.
- Hold the vertical track plumb and snug lag screws, keeping clearance even from bottom to top.
- Connect the curved horizontal track at the flag bracket and add the end bearing plate where the shaft will sit.
- Fasten rear hangers to the ceiling plumb, allowing a 1/2″–1½” rise at the back for proper parking.
Check level across both tracks and confirm each vertical is plumb. Verify smooth transitions by moving the panels by hand. Once movement is free and even, tighten lag screws and bolts side by side.
If aligning overhead hardware isn’t your preference, we can level and test your new system the same day. Call Garage Home Pros at (321) 200-0727 for service in Davenport and nearby towns.
Integrating panels, rollers, and brackets with the track system
Stacking panels with care sets the tone for quiet, long‑lasting operation. Identify the bottom panel by its weather‑strip. Fit bottom cable and roller fixtures at both corners before moving the stack into place.
Lay panels face down while you stage hinges and bottom brackets. Bring the first panel into the opening centered and level. Place each panel on the last, confirm edges are flush, then fasten hinges.
- Use #1 hinges at intermediate stiles and the numbered end hinges where specified so the door bends predictably.
- Insert a roller at each end hinge and in bottom fixtures, then gently wrap the vertical tracks around the wheels before final tightening.
- Set adjustable top fixtures a few inches below the top edge so the top roller rides cleanly through the curve.
Keep clearances consistent along the side and through the curve. If you hear scraping or feel resistance, move the tracks slightly and recheck before tightening hardware. Cycle the door by hand slowly and confirm quiet travel.
Need help stacking without scuffs or dents? We’ll deliver a precise fit. Garage Home Pros: (321) 200-0727 – garagehomepros@gmail.com – Family‑owned since 2014.
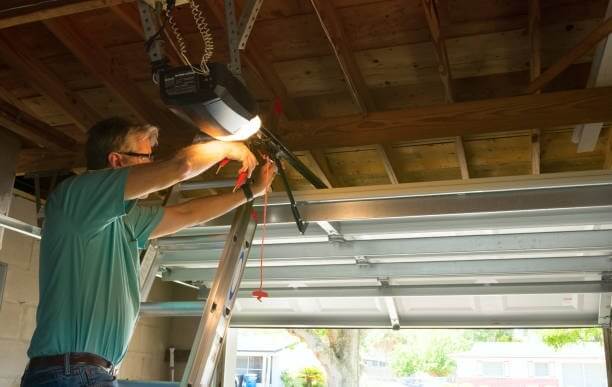
Spring systems and opener considerations that affect track setup
Opener placement and spring balance work together to keep guides true and quiet.
Torsion vs. extension springs changes the approach and risk. Torsion springs sit on a shaft above the opening and require proper winding bars. Extension springs run along the side and must have safety cables through the center.
Even cable tension matters. Unequal tension makes the door tilt, bind, or scrape. After any spring work, verify vertical tracks and horizontal tracks remain true at the top and along the curve.
Opener rail, sensors, and headroom
Mount the opener rail on the door centerline and keep it straight. Confirm there is enough ceiling clearance so the opener hardware doesn’t pull the guides out of square.
- Set photo‑eye sensors low and parallel to avoid false reversals.
- Operate the system manually first; it should balance at mid‑travel.
- If the door feels fast or heavy, stop and adjust spring turns or call us.
Working with springs is dangerous. We handle torsion and extension setups daily and can balance and test your system safely. Call Garage Home Pros at (321) 200-0727 for prompt service, Monday–Saturday 8:00 a.m.–9:00 p.m.
Troubleshooting track installation and when to call Garage Home Pros
A misaligned guide usually gives clear clues before serious damage occurs. Catching issues early protects panels, rollers, and hardware.
Common signs: door off track, binding in the curve, uneven gaps at the jambs, or noisy rollers. Each symptom points to a specific part of the system that needs attention.
- Re‑level the vertical track so clearances match from bottom to top and rubbing stops.
- Re‑square horizontal sections at the flag bracket to smooth the curve and eliminate binding.
- Adjust brackets so rollers ride centered in the cup; misalignment wears parts fast.
- Check ceiling and rear hangers for loose fasteners that let the tracks shift under load.
Safety first: clamp or lock the door before any work. Springs, cables, and drums hold dangerous tension and must be handled by trained technicians using proper tools.
If the opener is straining or the door keeps reversing, disconnect power and test the system by hand. When in doubt, call us. We fix doors off tracks, binding doors, broken springs, and cable issues—fast.
Contact Garage Home Pros: (321) 200-0727 — garagehomepros@gmail.com. Family‑owned since 2014. Emergency repairs, Monday–Saturday 8:00 a.m.–9:00 p.m., serving Polk, Osceola, Lake, Orange, and Seminole counties within 20 miles.
Conclusion
Wrap up by running the door several times and confirming even clearances.
Run the unit slowly through full travel. Watch that the vertical track and horizontal track line up from the door opening at the bottom to the top. Check that brackets and hinges stay snug and that rollers move freely.
Use light oil on steel rollers; avoid grease on rail surfaces. Adjust door stops at the jambs so the seal holds without binding. Level any uneven sections and tighten final fasteners evenly.
If your schedule is tight or you want a precise new garage door or garage door installation, we’ll finish the job to spec. Call Garage Home Pros at (321) 200-0727 or email garagehomepros@gmail.com. We serve Davenport, FL and nearby towns.